

Hovel Pencil Plane and Iris Drawing Compass From Makers Cabinet
Hovel Pencil Plane and Iris Drawing Compass From Makers Cabinet
for the past year and a half or so, I have received recommendations and requests to review the Hovel Pencil Plane by Makers Cabinet. I am always asking and incredibly grateful to receive new and interesting recommendations of products to review. When I first discovered the Hovel Pencil Plane, I was really excited about the prospect of testing and demonstrating what looked like a thing of beauty on photos I had seen. (Incidentally the correct spelling of Hovel is Høvel however, I have kept it simple for search properties and people looking for information on the Hovel from Makers Cabinet)
So, as always I reached out to Makers Cabinet requesting information about the Hovel Pencil Plane and if I could purchase one to review. I was blown away when they replied explaining that they had checked out The Art Gear Guide via the links I supplied and were happy to send a Makers Cabinet Hovel Pencil Plane out for review purposes. At the time of this correspondence, I was fully aware that Makers Cabinet made other products, one of which is the Iris Drawing Compass and the other item the Stria, both in their own right absolutely exception examples of true high quality craftsmanship. Nevertheless, my main concern was the Hovel Pencil Plane
You can imagine my absolute joy and delight when the package arrived and inside was not only the Hovel Pencil Plane, but also the Iris Drawing Compass, I was over joyed, very reminiscent of a wide eyed chidden on Christmas morning, not know which delight to open first.
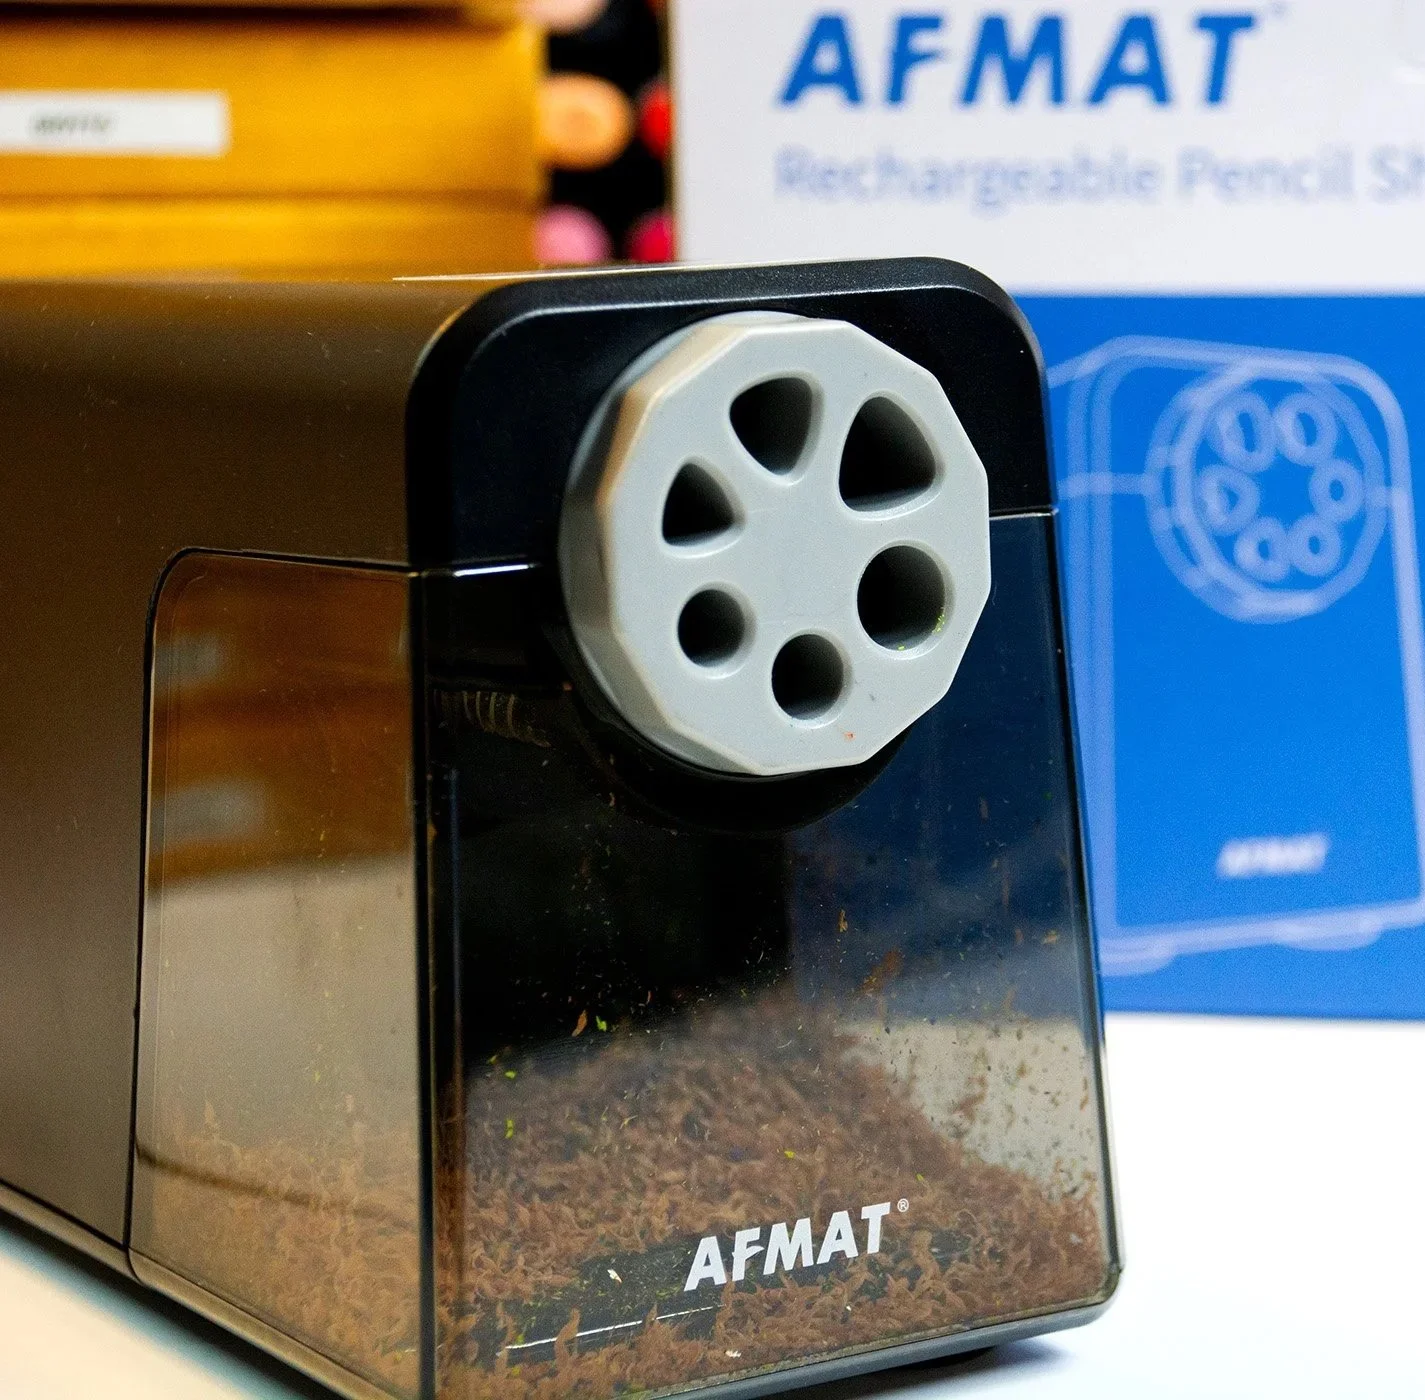
Hovel Pencil Plane
The Hovel Pencil Plane is essentially a pencil sharpener, however, and for those of you who have followed me for quite some time now, you will know I very rarely actually recommend products to you. I simply test and demonstrate what I have to the best of my ability and in as much detail as I can, allowing you as the viewer to make your own informed decisions as to whether or not said product is for you.
Th Hovel Pencil Plane is slightly different in that, of all the products I have reviewed and used for sharpening pencils, and I do mean all pencils; pastel pencils, hard core pencils, soft cored pencils, graphite pencils, water-soluble pencils and charcoal pencils, the Hovel is by a significant distance the best I have ever used. I will of course explain why I feel this is the case further into the review and you can also check out my YouTube video review of the Hovel for an extra insight into the product.
When testing the Hovel, I have also tried my best to consider all those pencil artists out there who may suffer with arthritis in their hands or other such ailments hindering them. I think one of the most common questions I am asked is to recommend the best sharpener. So many of you spend a lot of your hard earned money on colored pencils or other artist quality pencils and so finding the perfect sharpener is so important, ensuring that a cheap sharpener being used, isn’t going to snag the wood or chip the core of the pencils. The really difficult thing about answering such a question is that there are so many different types of pencils and as discussed, people with issues such as arthritis have specific requirements also. But I genuinely think that the Hovel is the tool for all of those pencils and other issues.
A thing of Beauty
before we get into the practicality of the Hovel Pencil Plane, we have to marvel at the Hovels beauty. The wonderfully magical people at Makers Cabinet have though of absolutely everything when designing the Hovel Pencil Plane, how it is held, the longevity of the material used and the beauty of the item. The Hovel is not and I repeat not the type of sharpener that you use and put away in your pencil case, of course you can do this, but the beauty police might arrest you. The Hovel Pencil Plane looks absolutely stunning just sat resting on your studio desk, ready for pencil action. The Hovel Pencil Plane is a centre piece and a conversation starter.
The entirety of the Hovels gorgeous body is polished brass, which adds just the perfect weight to the item when sharpening your pencil. As a separate item, Makers Cabinet have designed a gorgeous wood base to help display the hovel and to add an extra method of sharpening your pencil. I will discuss the wood base in more detail later,
On either end of the Hovel are gentle grooves, strategically placed for your thumb and forefinger to rest when using the item. The working part of the Hovel is the centre, which houses the blades and is closed using a small textured brass screw. On the opposite side of this is the name of the product, delicately engraved into the brass only adding to the overall sophistication of the item.


Even the packaging that the Hovel and Iris is presented in is exquisitely manufactured and designed, sustainable materials, friendly to the environment, nothing at all is left to chance, the team at Makers Cabinet
Hovel Wood Base
The Hovel Pencil Plane has the option of purchasing separately a gorgeous walnut wood base, this base not only acts as a beautiful display for the Hovel, but it also doubles as a second method of sharpening your pencils whilst collecting the shavings from the pencil.
The Hovel Pencil Plane works absolutely perfectly without the wood base, however, Makers Cabinet have added such a low price tag to this part of the Hovel, I think it would be such a shame to leave it. My YouTube video demonstration of the wood base will show the full extent of this simple, yet eloquent and functional product
How To Use The Hovel Pencil Plane
The Hovel Pencil Plane when purchased arrives with a barrel of 10 blades, no other sharpener that I know of comes with ten spare blades when first purchased. The pack of 10 blades can also be purchased separately as and when needed from Makers Cabinet and at an exceptionally reasonable price point.
Taking the Hovel in your hand, placing the thumb and forefinger at either end of the Hovel for a naturally comfortable grip, using your other hand you unscrew the brass textured thumbscrew. On doing this, the clamp that holds the blades in place will come away completely from the body of the Hovel.
When you look at the clamp that you have just removed, you will see a small lip, place a new blade, with the shiny beveled edge of the blade visible, onto the clamp, allowing the blade to sit flush with the lip. There are also small magnets on the clamp which help keep the blade in place when replacing the clamp.
Now that the blade is in place, line the thumbscrew up to the body of the Hovel from where its was originally removed and tighten the thumbscrew. Finally, turn the Hovel over so that you can see the base, here you will be able to see a certain amount of the blade protruding from the base, at this point it is best to have a pencil on had for testing.
If you have too much of the blade protruding it won’t slice the wood right and not enough of the blade will prevent sharpening at all. All you need to do is losing the thumbscrew slightly allowing for the blade to move up or down and set it to where you are comfortable and the blade is gently slicing the pencil wood. I know this sounds like a lot of detail, but I promise, the first time you do this is the hardest and even then it isn’t difficult, every time you need to replace a blade from this point on, after your first attempt it is fast and easy and you will know at a glance how much blade is required. Again I show all of this on my YouTube video review and of course Makers Cabinet have provided a very simple and easy to follow instruction booklet in the box.
Once the blade is in the right position you are good to go and start sharpening your pencils. Holding the Hovel in your dominant hand and the pencil in your other hand, run the Hovel along the barrel of the pencil toward the point. Depending on the angle you hold the Hovel at will depend on the type of point you require. Some pencil artists prefer a long point and others a much shorter point, with the Hovel you are in control of the core point.
If you have ever used a Plane in wood Work Class in school, you may remember how that tool worked, as you pushed the plane along the wood surface, thin shavings of wood curled out. The Hovel provides exactly the same experience only on a much smaller scale.
The Hovel does away with so many headaches that the conventional sharpener provides, with the hovel, all barrel sizes fit, no more chunky barrels not fitting in in slots, left or right handed people can use the Hovel, if the pencil you are sharpening isn’t centred properly, the Hovel takes care of it with no problems. Conventional craft knifes, which the Hovel would be closest to in diversity, make the barrel of the pencil look terrible, with chunks taken out of the wood, with the Hovel, you have much more control and whilst slowly turning the pencil, the hovel creates a sharpened core that looks like it was done in a sharpener.
In the YouTube video I have created, I used a completely unsharpened Dixon Ticondaroga pencil which obviously takes a bit of time to sharpen from scratch, but the beauty of the Hovel is simply refining your core as you work. As Colored Pencil artists, we are always looking for a sharp point and often a lot of the time when we use a sharpener, it is a waste of pencil. The Hovel however, allows you to keep refining your core to a sharp point without wasting away your pencil.
The second method of sharpening a pencil with the Hovel is using the Wood Base, simply place the Hovel upside in the wood base and from there you place the base on a table, rubbing the pencil backwards on the blade which allows you to refine the core even further given the extra stability of the table. Obviously I have no issues with my hand regarding arthritis etc, but I would imagine this method to be most beneficial for those who do suffer. The Wood Base also collects the shavings and from there, once you have refined your core, simply remove the Hovel and empty the base.
Iris Drawing Compass
As I mentioned at the beginning of the article, when I contacted Makers Cabinet about the Hovel Pencil Plane, I knew about the Iris, but never in a million years expected them to send the Iris as well. Need less to say, when I seen the Iris in the box I was over joyed
Although the Iris may not be for everyone who watches The Art Gear Guide, it is a tool that everyone will appreciate. I think the Iris is the perfect tool for artists who love creating Mandalas, creating Mandalas is quite technical and intriquet, when using a traditional compass, pin points are left all over the paper, but with the Iris, non of those problems exist.
The Iris Drawing Compass, just like the Hovel Pencil Plane is an absolute thing of beauty, the body of the Iris is solid Brass adding a well balanced weight to the item. As with the Hovel, there is a Walnut Wood base for the Iris, only with the Iris it is included in the box as the stand is quite an essential part to the working of the Iris.
On opening the Iris box, you are presented with the beautiful solid Brass ring, in the centre of which is placed the Walnut Wood Base, there is also a beautifully designed booklet inside to help show you how the Iris works.
On the surface of the Iris is a laser etched textured design which allows your fingers to turn the Iris, but although the texture has a function, it isn’t just scratched on, it is designed in exquisite fashion, beauty can also be functional, functionality doesn’t have to look ugly and Markers Cabinet have demonstrated this throughout their products.
Along the bottom of the Iris is etched measurements from zero to seven centimetres, along which an etched red arrow indicates the size of the circle you may want. On the underside of the Iris there is a soft rubber material which helps to keep the Iris in position whilst on the paper surface.
Once you place the Iris on the paper, before you do anything, place the wood stand along the inner ring of the circle, where the stand point lays is the centre of the circle. Simply place a mark on the paper and this is always your centre point for that circle, again I demonstrate this on my YouTube video review which might shed more clarity on the instructions.
Remove the stand from the centre of the Iris and now the magic begins, applying a small amount of pressure onto the textured surface of the Iris and twist anti-clockwise, allowing the red etched arrow to mark out the size of circle you require. As you perform this action you will see the polished metal aperture blades unfold in exactly the same fashion a camera lens works. The mechanics of the Iris at work are mesmerising to watch and to see such precision play out, unfolding into such a productive and useful tool is incredible.
On the underside of the Iris, as if Makers Cabinet had not demonstrated their brilliance enough thus far, when you fully open the Iris to produce the smallest circle size, the company logo and the product name Iris appear as if by magic. It truly is an honour to review such beautiful instruments of art, craft, technical drawing and architecture. As with the Hovel, the wood stand can be used to display the Iris on your desk when not in use.
I think one of the biggest benefits to using the Iris over a traditional compass is this, when an artist create a Mandala on expensive Bristol Board paper, using a traditional compass leaves tiny pin holes all over the paper. With the Iris, nothing like this happens, leaving your surface fully in tact.
Hovel and Iris Pricing
Before announcing the pricing, when I first seen the prices and the products I thought luxury items, however this is no longer the case. As a pencil artist, if you look anywhere on line seeking a good quality sharpener, you will most certainly find sharpeners much more expensive than the Hovel or about the same price and none of them have a fraction of the beauty and class of the Hovel.
With regards to the Iris, if you are an individual who draws with accuracy a lot of circles, i.e. a Mandala artist, the Iris is worth every penny. If however you are unlikely to use such a tool then it very much falls into the Luxury category. However, it is like anything in life, if you are a artist working with fine-liner ink pens, then a sharpener of any kind is not relevant to your collection. We all require different tools throughout our life to aid our passions and we must weigh up the cost on an individual basis and the merits of usage.
Here in the UK the following prices are in place for the Hovel Pencil Plane and Iris Drawing Compass. The Hovel on its own will cost £57.60, all prices include Vat. To purchase the Walnut Wood Base for the Hovel will cost you £12. To purchase a refill of 10 blades for the Hovel will cost you £3. To purchase the Iris with the stand will cost you £108.
In the US the following prices are in place for the Hovel Pencil Plane and Iris Drawing Compass. The Hovel on its own will cost $80.40, To purchase the Walnut Wood Base for the Hovel will cost you $16.80. To purchase a refill of 10 blades for the Hovel will cost you $4.80 To purchase the Iris with the stand will cost you $126.
For Artists in Australia the following prices are in place for the Hovel Pencil Plane and Iris Drawing Compass. The Hovel on its own will cost $105.60, To purchase the Walnut Wood Base for the Hovel will cost you $22.80. To purchase a refill of 10 blades for the Hovel will cost you $6. To purchase the Iris with the stand will cost you $198.
For Artists in Europe, the following prices are in place for the Hovel Pencil Plane and Iris Drawing Compass. The Hovel on its own will cost €67.14, To purchase the Walnut Wood Base for the Hovel will cost you €14.34. To purchase a refill of 10 blades for the Hovel will cost you €3.54. To purchase the Iris with the stand will cost you €124.
For artists in Canada the following prices are in place for the Hovel Pencil Plane and Iris Drawing Compass. The Hovel on its own will cost $103.20, To purchase the Walnut Wood Base for the Hovel will cost you $21.60. To purchase a refill of 10 blades for the Hovel will cost you $6. To purchase the Iris with the stand will cost you $161.
When you visit the Makers Cabinet website, they have prices for so many countries, so if I have not included your country here in this review, just visit the Makers Cabinet site and you will be showing the prices. I would like to assure you all that I do not receive a penny for sending you to the Makers Cabinet website, financial gain is not why I run The Art Gear Guide, I do it because I love what I do and I especially love the idea that I am helping others determine if a product they may have been eyeing for a while is for them or not. I used to love the idea of helping others as a Soldier in the British Army, but since my disability I could no longer do this and so to still help people, even in this very small way, is all the payment I want. If you purchase anything from the Makers Cabinet website via any of the links above, you get a beautifully functional product and they get paid for their hard work and brilliant ideas, really simple.
Hovel and Iris Conclusions
I have to say right of the bat, I am in no way being paid or endorsed by Makers Cabinet and I feel I have to say this given my excitement and enthusiastic review. My feelings for both of these products and genuine and as much as I tried, could not be contained. I actually wrote an email to Makers Cabinet telling them that if someone had told me when training to be a front line elite infantry soldier that I would one day get excited over a pencil sharpener and compass, I would have thought they had lost their mind, yet here I am completely bowled over by both of these products.
The level of detail, design, craftsmanship, dedication and love that has gone into products from Makers Cabinet is so plain to see. This company has not only provided absolutely breathtakingly gorgeous products but products that are equal in functionality and the two don’t always go hand in hand.
After reviewing both the Hovel and Iris, I will definitely be purchasing the Stria partly to complete the collection, but the Stria also looks to fall into the same categories as the Hovel and Iris, functional things of beauty.
As someone who lives very much on the financial bread line, I completely understand the factor pricing has when we all come to determine what we purchase. However, how many times have you heard or even said yourself, things like, “Nothing in this day and age is made to last” or “They don’t make them the way they used to”? Well, Makers Cabinet do exactly that, they make them very much to last and probably much better than they used to. Both the Iris and the Hovel are items that will not only last your lifetime, but when your grandchildren are making holograms of HoloTube years from now, they will be showing their audience the antiques from their grandparents day, only, the Hovel and Iris will still look like products of their time and still in pristine condition.
I always provide a YouTube Video review of my written reviews, just to add another perspective of the review, most of the time the video reviews are just there if needed, however, I feel for the Cabinet Makers Hovel and Iris, checking out the YouTube video review will be really beneficial. I think the video will help you see the true beauty of both products and most importantly the functionality and productivity value each item offers. As always if you have any questions at all, please leave them in the comments section below, or if you would prefer you can ask me in private via my email theartgearguide@gmail.com. Likewise isf you have used either the Hovel or Iris I would love to hear your experience with the items. Thank you so much to Makers Cabinet for send both these absolutely magnificent tools to me for reviewing, it is so clear to see the personal love, professionalism and dedication that has been invested into these products, thank you so much for sharing your designs and passions with the rest of the world.